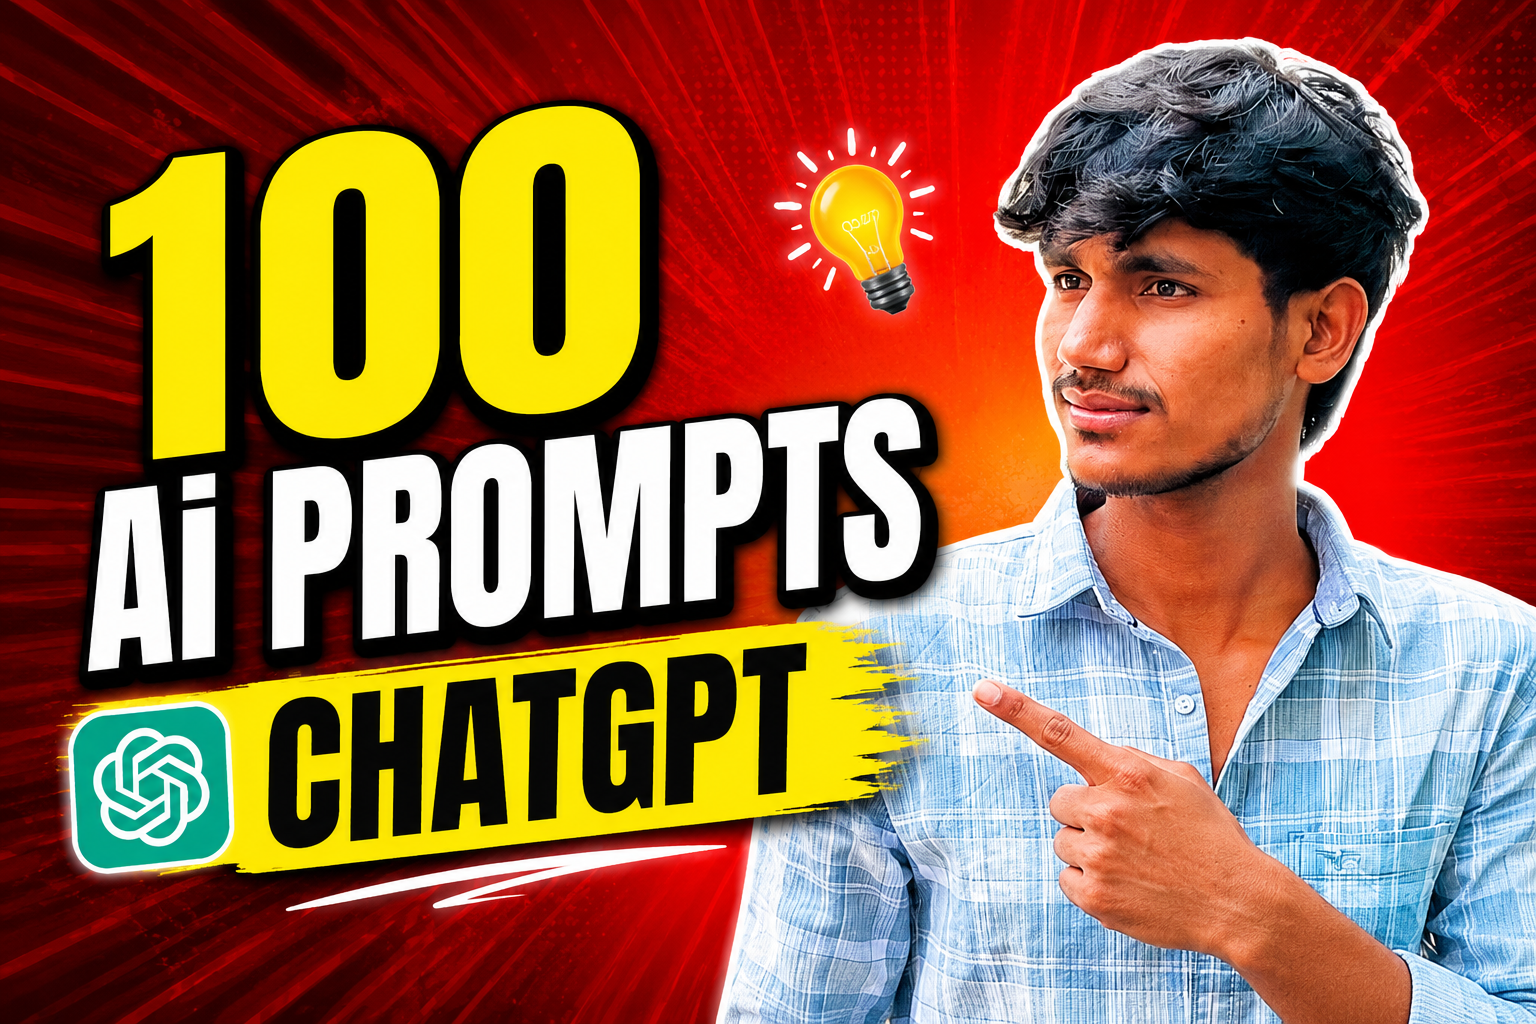
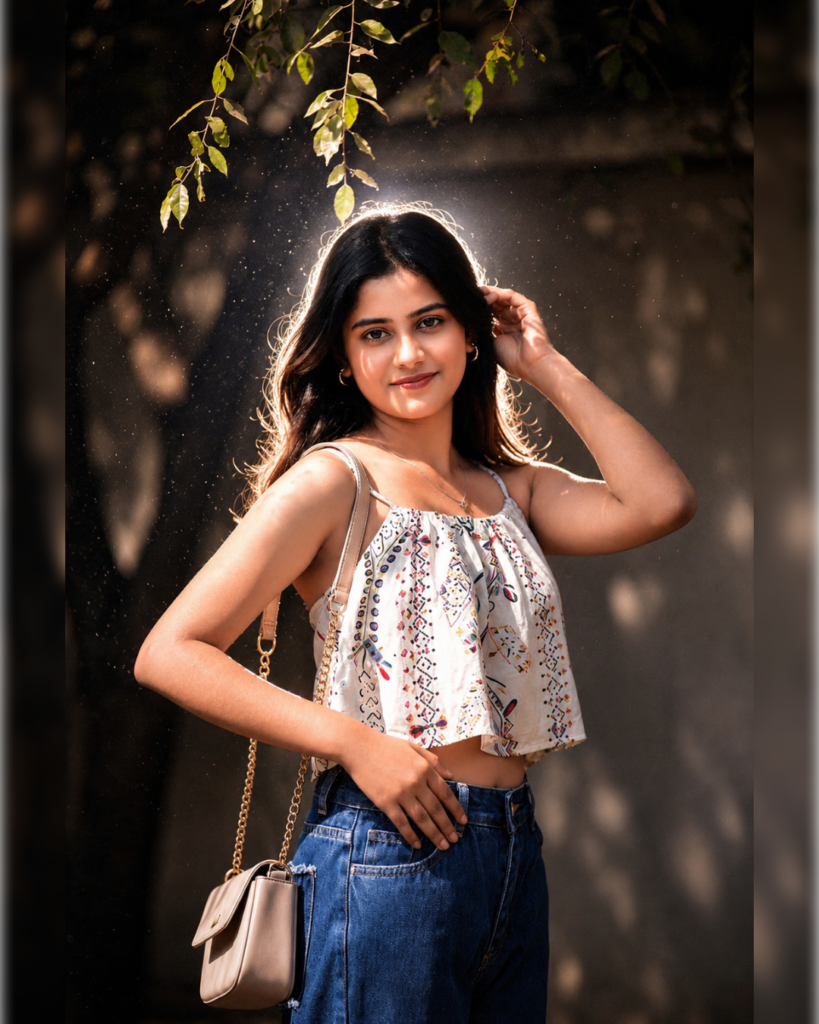
All Prompt 👇
Namaskar dosto! Main ek professional video editor hoon aur is creative editing industry mein lagbhag 7 saal se zyada ka waqt bita chuka hoon. Agar aap digital content aur editing ki duniya se jude hain, toh aapne shayad mere YouTube channel “m4editorofficial” (jiske 13.6K subscribers hain) ya Instagram page “m4_editor_official” (jispar 145K followers hain) ko zaroor dekha hoga. Wahan main daily basis par real editing knowledge aur trending techniques share karta hoon. Is website ke zariye mera sabse bada maqsad ye hai ki main aap sabhi naye creators ko bilkul free mein high-level practical guidance de sakun, taaki aap bina kisi mehange course ke genuine editing skills seekh kar apna career grow kar sakein.
Free Mein AI Tools Kaise Use Karein? (Top Tools & Smart Creator Hacks) M4 46
Aaj ke digital daur mein Artificial Intelligence (AI) ne content creation, blogging, aur video editing ki poori duniya ko hila kar rakh diya hai. Ek aam creator se lekar millions subscribers wale YouTubers tak, har koi apne workflow ko fast, creative, aur highly engaging bananey ke liye AI ka upyog kar raha hai.
Lekin jab ek beginner is field mein kadam rakhta hai, toh uske samne sabse badi problem budget ki aati hai. Internet par Midjourney, ChatGPT Plus, ya Premiere Pro ke AI features jaise premium tools bhare pade hain, jinki subscription fees bohot zyada hoti hai. Aise mein har naye creator ke man mein ek hi sawal aata hai ki “Free mein AI tools kaise use karein?”
Aapko bilkul bhi niraash hone ki zaroorat nahi hai! Aaj ke is highly detailed aur premium guide mein, main aapko aise top-tier AI tools ki list aur unko use karne ke secret hacks bataunga jo 100% free hain. In tools ki madad se aap apni script writing, voiceover, image generation, aur video editing ko next level par le ja sakte hain. Ye article poori tarah se value for information hone wala hai, toh isko end tak zaroor padhein.
Content Creators Ke Liye Best Free AI Tools Aur Unka Practical Upyog
Ek viral video ya high-quality content banane ke liye mainly 4 pillars hote hain: Idea/Script, Visuals (Images/B-rolls), Audio, aur Editing. Hum in chaaron pillars ko free AI tools ki madad se strong karna seekhenge.
1. Scripting Aur Viral Ideas Ke Liye: Google Gemini & ChatGPT
Detailed Explanation:
Kisi bhi video ya blog ki aatma uski script hoti hai. Agar shuruwat ke 3 seconds mein aapka ‘Hook’ strong nahi hai, toh log aapki video skip kar denge. Naye aur trending ideas sochne ke liye aapko kisi expensive copywriter ki zaroorat nahi hai. Aap Google Gemini ya ChatGPT ke free versions ko apna personal scriptwriter bana sakte hain. Ye tools natural language processing ka use karte hain aur bilkul human-like engaging content likh sakte hain.
Beginner-Friendly Practical Tip:
AI se best results nikalne ki trick ko ‘Prompt Engineering’ kehte hain. AI ko kabhi bhi aam commands mat dein (jaise: “Ek comedy script likho”). Balki usko ek clear aur detailed direction dein:
Prompt Example: “Main ek 60-second ki Instagram reel bana raha hoon. Mujhe ek aisi script do jisme college students ki daily life par situational comedy ho. Pehle 3 seconds mein ek badiya hook hona chahiye. Dialouges simple Hinglish aur thode trending slang (jaise ‘bro’, ‘scene sort hai’) wale hone chahiye taaki audience relate kar sake.”
Is approach se aapko completely original, engaging, aur ready-to-shoot script milegi.
2. High-Quality Images Aur Thumbnails Ke Liye: Bing Image Creator & Leonardo AI
Detailed Explanation:
Apni videos ko visually stunning banane ke liye humein premium stock footages, cinematic B-rolls, ya 3D backgrounds chahiye hote hain. Midjourney visuals ke liye best hai par wo paid hai. Iska sabse solid aur free alternative Microsoft ka ‘Bing Image Creator’ hai (jo DALL-E 3 technology par based hai) aur ‘Leonardo AI’ hai. Ye dono platforms aapko daily free credits dete hain jisse aap ultra-realistic HD images aur art generate kar sakte hain.
Beginner-Friendly Practical Tip:
Bing Image Creator se perfect image nikalne ke liye aapko apne prompt mein Lighting, Style, aur Resolution define karna hota hai.
Prompt Example: “A highly detailed 4K cinematic render of a futuristic neon street at night, cyberpunk aesthetic, rainy weather, glowing billboards, highly photorealistic.”
Kuch hi seconds mein AI aapko 4 stunning variations dega jinhe aap easily download karke apne video ke background ya YouTube thumbnail mein use kar sakte hain.
3. Studio Quality Voice Enhancement Ke Liye: Adobe Podcast AI
Detailed Explanation:
Ek bada rule hamesha yaad rakhein: Audience low-quality video (720p) bardasht kar legi, lekin kharab, echo wali, ya background noise wali audio kabhi nahi. Agar aapke paas mehenga studio microphone nahi hai, toh ‘Adobe Podcast Enhance’ aapka life-saver hai. Ye ek bilkul free web-based AI tool hai jo aapke saste earphone ya normal phone mic se record ki gayi aawaz ko process karke usme se background noise (jaise fan, traffic, hawa) hata deta hai.
Beginner-Friendly Practical Tip:
Apne phone mein normal script padhte hue voice record karein. Usko MP3 ya WAV format mein save karein. Ab Google par ‘Adobe Podcast Enhance’ search karein, free login karein, aur apni file upload kar dein. Processing ke baad jo clean aur enhanced audio milegi, wo bilkul aisi lagegi jaise kisi ₹20,000 ke mic se record ki gayi ho. Is clean audio ko seedha apni editing timeline par import karein.
4. Free AI Voiceovers Ke Liye: TTSMaker (Text-to-Speech)
Detailed Explanation:
Agar aap ek faceless channel (jisme aap apna chehra aur aawaz nahi dikhate) run kar rahe hain, toh aapko ek natural sound karne wale voiceover ki zaroorat padegi. ElevenLabs premium ho chuka hai, lekin ‘TTSMaker’ ek aisi free website hai jo unlimited characters aur natural-sounding AI voices provide karti hai. Isme aapko Hindi aur English (Hinglish) dono ke liye best voices mil jayengi.
Beginner-Friendly Practical Tip:
Apni AI generated script ko TTSMaker mein paste karein. Wahan se ek natural human voice (jaise kisi news anchor ya storyteller ki aawaz) select karein. ‘Pause’ aur ‘Pitch’ features ka use karke voice mein emotions dalein taaki wo robotic na lage. Phir us MP3 ko download karke apni video par laga lein.
5. Video Editing Ke Smart AI Features: CapCut (Free Version)
Detailed Explanation:
Jab aapke paas audio aur visuals aa jayein, toh unhe assemble karne ke liye aapko ek fast editor chahiye. Mobile aur PC dono ke liye CapCut ek aisi free application hai jiske andar powerful AI tools in-built aate hain. Aap isme free mein background remove kar sakte hain, auto-captions generate kar sakte hain, aur AI filters laga sakte hain.
Beginner-Friendly Practical Tip:
Aaj kal screen par chalne wale text (Captions) retention badhane ka sabse bada hack hain. CapCut mein apni video import karein, ‘Text’ section mein jayein aur ‘Auto-Captions’ par click karein. AI automatically aapki audio ko sunkar screen par text likh dega. Is text mein ek badiya sa font (jaise ‘The Bold Font’ ya ‘Montserrat’) aur yellow/white color ka stroke laga dein. Aapki video ekdum Alex Hormozi ya professional creators jaisi lagne lagegi.
Bonus Tip: AI Tools Ko Combine Karke ‘Smart Workflow’ Banana
Ek smart aur pro-level creator kabhi bhi hard work nahi karta, wo ‘Smart Work’ karta hai. In sabhi free tools ko mila kar ek workflow banayein:
- Sabse pehle ChatGPT par jayein aur apne topic ke liye top 5 viral ideas aur script likhwayein. (Time taken: 5 Mins)
- Us script ko TTSMaker mein daal kar ek natural AI voiceover generate karein. (Time taken: 2 Mins)
- Apni script ke hisaab se Bing Image Creator se 10-15 high-quality 3D images generate karein. (Time taken: 10 Mins)
- In sabhi images aur audio ko CapCut mein import karein. Images ke beech mein 3D transitions lagayein aur Auto-captions on kar dein. (Time taken: 15 Mins)
- Dekha aapne? Sirf 30 se 40 minute ke andar aapki ek premium, faceless YouTube Short ya Instagram Reel taiyar hai, wo bhi bina ek rupya kharch kiye!
Common Mistakes Beginners Should Avoid (Naye Creators Ye Galtiyan Na Karein)
AI ek assistant hai, replacement nahi. Naye log free AI tools use karte waqt ye galtiyan karte hain jinse unka channel dead ho jata hai:
- Blind Copy-Paste Karna: ChatGPT se script nikalkar bina padhe copy-paste na karein. AI ke words thode robotic ho sakte hain. Hamesha usme apna ‘Human Touch’, emotions, aur local slangs zaroor add karein.
- Watermarks Na Hatana: Kisi bhi free AI video generator ka use karte waqt agar video par watermark aa raha hai, toh log aapko unprofessional samjhenge. Hamesha unhi tools ka use karein jo clean export dete hain ya frame ko crop karke watermark hata dein.
- Boring Visuals: AI images agar screen par bina hile (static) rahengi toh audience bore ho jayegi. Editing software mein images par hamesha ‘Keyframe Animation’ (slow zoom-in ya zoom-out) apply karein.
- SEO Aur Metadata Ko Ignore Karna: AI se sirf script hi nahi, balki YouTube/Blog ke liye clickbaity Titles, SEO-friendly Descriptions, aur Viral Tags bhi likhwayein. Search engine optimization ke bina sabse achi video par bhi views nahi aayenge.
Conclusion
Dosto, digital creation ke is golden era mein AI aapka sabse bada aur sabse sasta sathi hai. Aaj is article mein humne detail mein samjha ki aapko mehange softwares kharidne ki zaroorat nahi hai. Aap ChatGPT, Bing Image Creator, Adobe Podcast, aur CapCut jaise free AI tools ka use karke ek pro-level content creator ban sakte hain. In tools ka smart tarike se istemal karna shuru karein aur apne workflow ko fast banayein. Hamesha yaad rakhein, AI sirf aapki mehnat aasan kar sakta hai, lekin usme ‘Soul’ (jaan) aapki khud ki creativity hi dalegi. Practice karte rahein, nayi cheezein seekhte rahein, aur apne creative ideas ko duniya ke samne lane se kabhi mat ghabrayein! Happy Creating!
Prompt👇
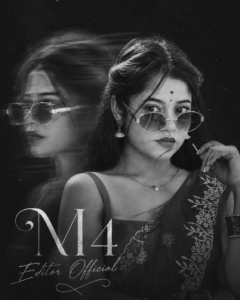
her face sharply focused and facing forward, same hair calm yet introspective, while a second ghosted profile drifts laterally with pronounced motion blur, as if pulled by time or memory. Her real face remains 100% unaltered —[image reference attached] Her hair moves subtly across her face, soft strands cutting through the frame. Cinematic text (M4 Editor Official) 4:5
Prompt 👇
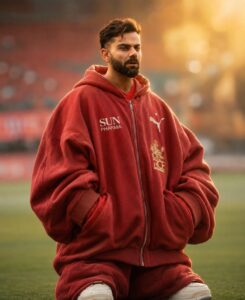
Focus on massive width, volume, puffiness, and exaggerated loose shape. The outfit should look absurdly oversized but still realistic. Do NOT create normal baggy clothes. The final look must feel giant, chunky, hanging, and extra bulky. Use reference face, 4:5. No face chenge. Bokeh backgraund
Prompt👇
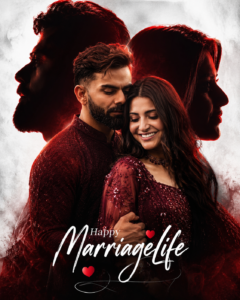
Ultra realistic romantic wedding poster of a South Indian couple, cinematic double exposure composition, loving couple pose with the man gently holding the woman, both wearing matching dark maroon outfits, soft emotional expressions, large black silhouette side profiles of both faces in background, glowing red rim light around silhouettes, white textured studio background, dramatic soft lighting, high contrast shadows, detailed skin texture, stylish typography “Happy MarriageLife” with elegant handwritten calligraphy, small red heart elements,
premium wedding album design, ultra detailed, DSLR quality, sharp focus, smooth skin retouch, cinematic color grading, Instagram trending poster style, 4:5 aspect ratio, 8K ultra HD, realistic depth, professional digital a editing, luxury wedding poster aesthetic. Marriage Life
Prompt👇
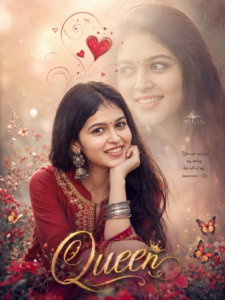
Ultra-realistic dreamy portrait of a beautiful young Indian girl wearing a deep red traditional kurti with elegant golden embroidery, long silky dark brown hair flowing naturally, soft glowing skin, cute innocent smile, resting chin on her hand, wearing oxidized silver jhumka earrings and bangles, aesthetic romantic mood, soft cinematic lighting, blurred pastel background with dreamy bokeh effect, faded large artistic face portrait in the background, red heart doodles and swirl designs above head, fantasy love-theme editing style, luxury digital art, detailed facial features, warm tones, butterflies and floral decorative elements at bottom, glowing “Queen” typography in stylish calligraphy, highly detailed, photorealistic, smooth skin texture, DSLR quality, shallow depth of field, magical atmosphere, trending Instagram edit style –ar 3:4 –quality 2 –stylize 750
Pronpt👇
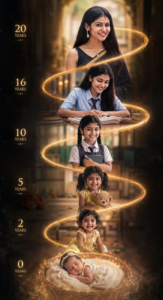
Prompt Create a vertical
cinematic life journey portrait showing the same girl at 6 ages (0, 2, 5, 10, 16, 20) connected by a glowing golden spiral timeline. Bottom: sleeping newborn in basket → smiling toddler → schoolgirl in uniform → teenage student writing → college + graduation portrait holding diploma → confident 20-year-old woman in a black saree with gold border.Prompt
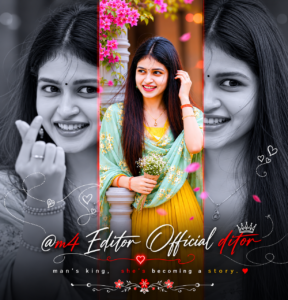
Prompt👇
A Uploaded image Create a luxurious cinematic same dress eyes, and an elegant calm expression. Use a dramatic black-and-white close-up portrait as the background, with a vertical translucent red strip in the center. Inside the red strip, place a smaller full-body portrait of the standing gracefully in front of an ornate palace-style backdrop. Add soft glow lighting, shallow depth of field, rich contrast, and premium editorial photography style. Include stylish handwritten typography at the bottom with the name “@m4 Editor Official ditor” and a tagline: “man’s king, she’s becoming a story.” Ultra detailed, dreamy, luxury wedding album aesthetic, high-end cinematic color grading, vertical composition, 4K. 4:5
Prompt 👇
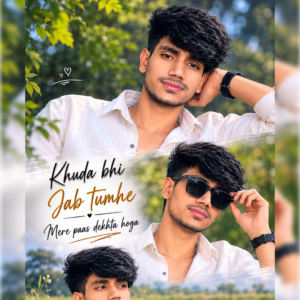
Ultra realistic cinematic vertical 9:16 triptych collage featuring the exact same person from the uploaded image with 100% face match, preserving exact hairstyle, beard, jawline, skin tone, sunglasses, body proportions, pose vibe, and facial identity. The person is standing alone in a lush green field during bright natural daylight. The collage is divided into three horizontal cinematic frames with soft dreamy white fade transitions between each section. Outfit includes an oversized stylish casual shirt with jeans, creating an emotional aesthetic vibe. Background contains blurred green grass fields, distant trees, dreamy natural bokeh, shallow depth of field, soft sunlight glow, cinematic color grading, DSLR quality, ultra realistic details. Romantic cinematic typography text included in three lines: “Khuda bhi” “Jab tumhe” “Mere paas dekhta hoga @m4_editor_official” in elegant glowing stylish font. Maintain realistic human anatomy, natural posture, soft emotional expressions, high detail skin texture, atmospheric depth, premium cinematic editing style.
Prompt👇
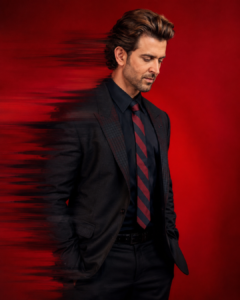
“A upload image stylish man side pose against a vivid seamless red studio background, wearing an same dress He is looking downward with a calm, introspective expression, hands partially in pockets. Dramatic cinematic lighting with soft shadows. Strong horizontal motion blur/glitch distortion effect slicing through the left side of his body, creating a dynamic disappearing effect.
High-fashion editorial photography style, minimal composition, ultra-detailed fabric texture, rich contrast, modern luxury aesthetic, shallow depth of field, sharp focus on face and upper body, 4K.”
Optional Negative Prompt:
“low quality, extra limbs, distorted face, bad anatomy, cluttered background, oversaturated skin, blurry face, watermark, text, duplicate body parts”
face matching 4:5
![]()
Prompt👇
A Ultra-HD 8K realistic size 9:16 EID MUBARAK HO photo A stylized digital composition featuring a young man (reference image) He appears in two instances within the frame. The main instance is on the left, depicted walking towards the viewer, wearing a dark brown Arabic stylish jubbah, white imamah pagri white design and white sneakers, and round sunglasses. He has dark, and a light stubble. A second, larger image of the man is positioned behind the first @m4_editor_official
Prompt👇
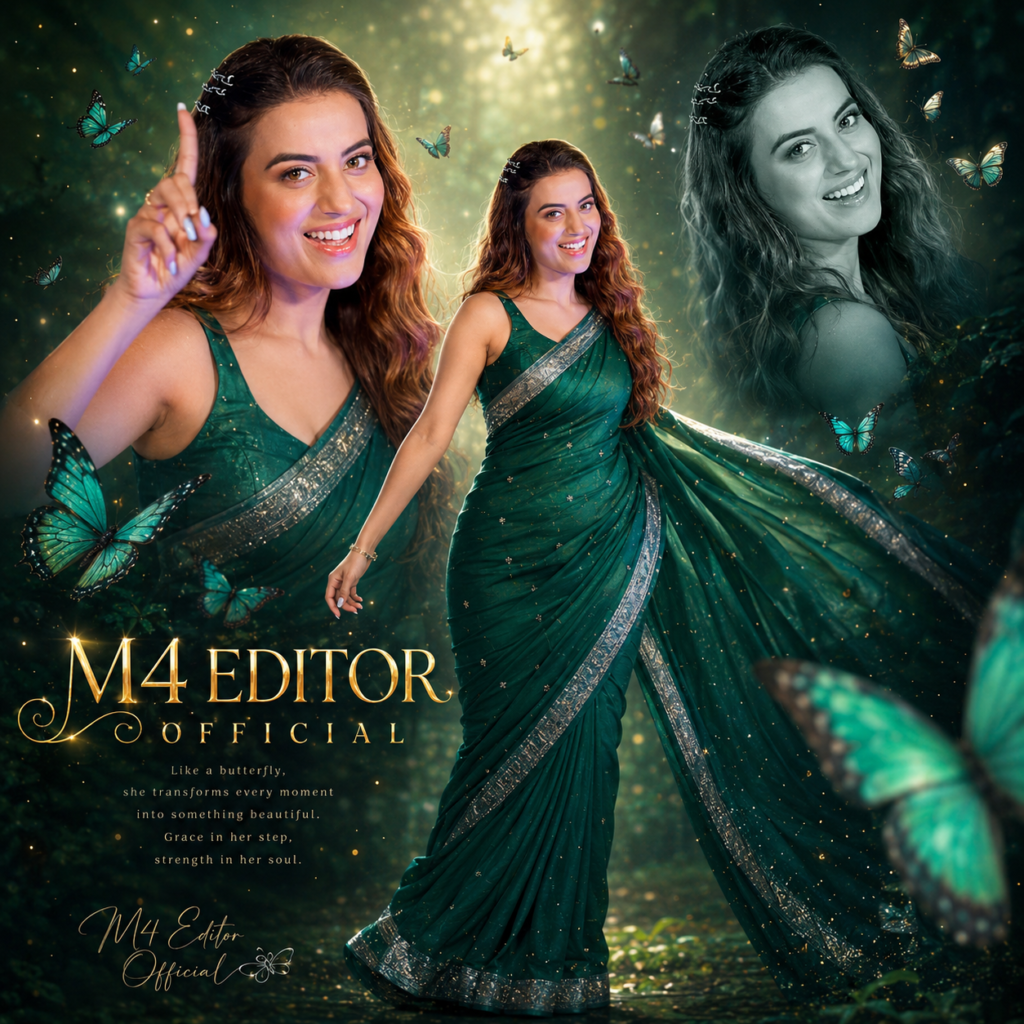
Create a high-resolution, cinematic butterfly-themed collage poster of a young South Indian woman \nName: [M4 EDITOR OFFICIAL] \nUse the uploaded image as the exact face reference (strict face preservation 100% identical facial features, skin tone, hairstyle, expression, no changes at all) to. The design should feature: A large central full-body image of the woman wearing a traditional saree (deep green with silver border), standing gracefully and slightly twirling .1.1 ratio
Prompt👇
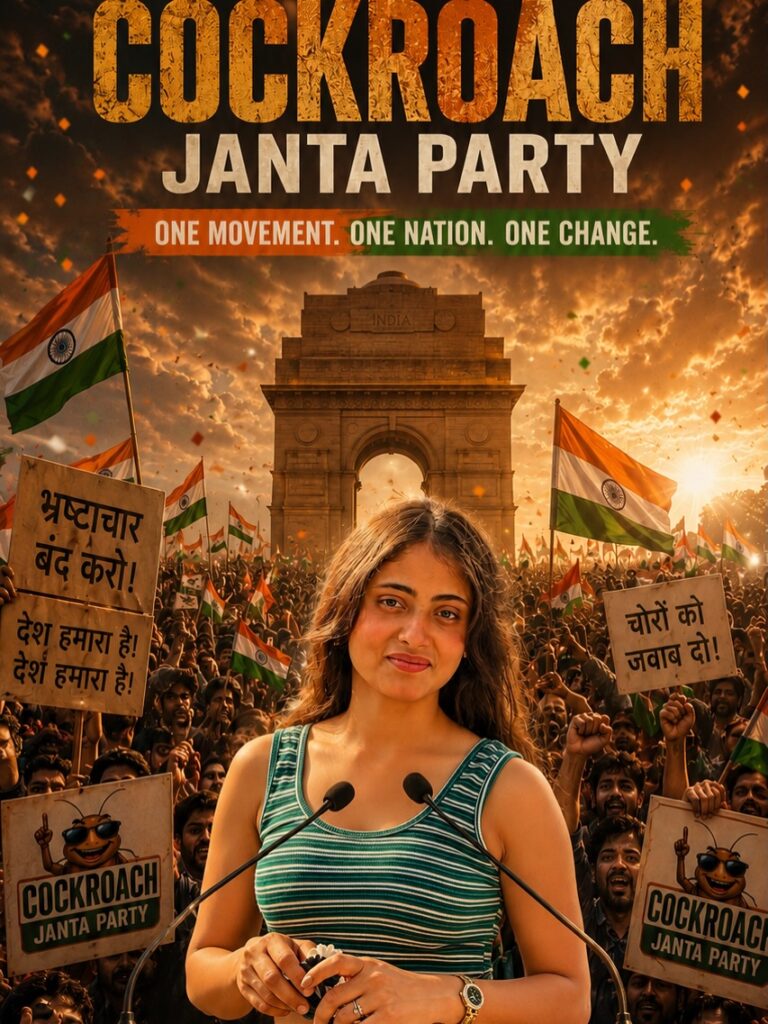
OCKROACH JANTA PARTY”. Wooden podium in foreground with glowing gold and green text “SUPPORT COCKROACH JANTA PARTY”. Confetti flying in air, sunset golden-hour lighting, dramatic cinematic shadows, ultra detailed textures, shallow depth of field, realistic skin details, political campaign aesthetic, DSLR quality, highly detailed insects, symmetrical composition, center framing, epic satire style, high contrast, warm tones, volumetric lighting, 8k ultra realism, poster design, vertical composition 4:5.
Negative Prompt 👇
blurry, low quality, low resolution, extra hands, extra fingers, deformed face, bad anatomy, cropped head, duplicate insects, unrealistic skin, bad text, watermark, logo distortion, overexposed, underexposed, noisy image, cartoonish face, flat lighting, messy composition.
“Use my uploaded reference photo for exact face identity and hairstyle preservation
Prompt👇
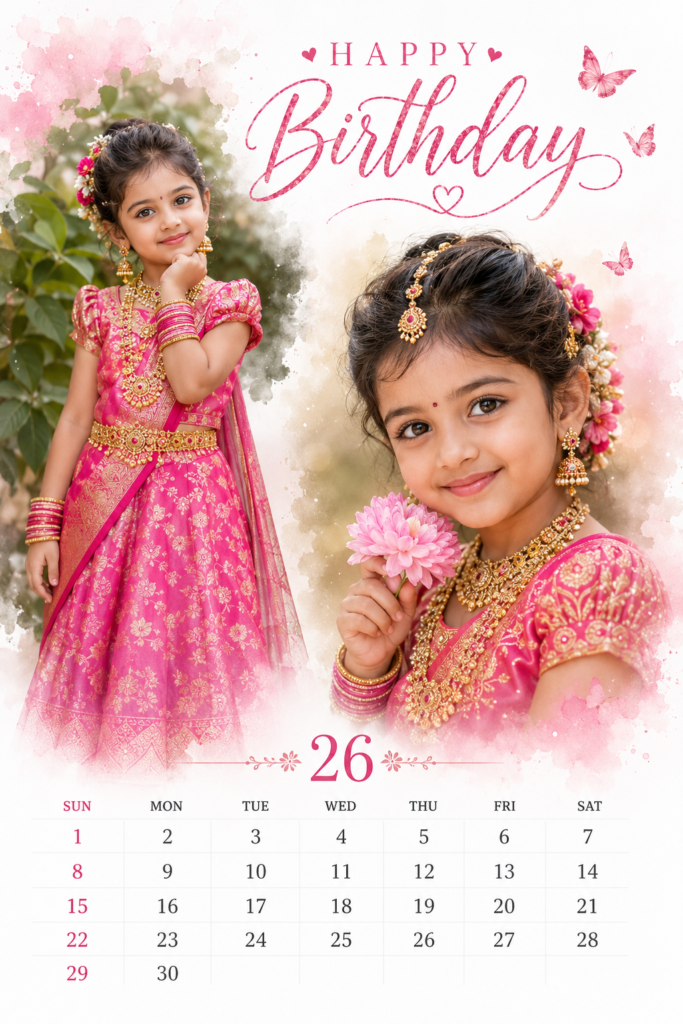
A cinematic ultra-realistic birthday calendar poster design in elegant pastel theme featuring a cute young Indian girl wearing a luxurious bright pink traditional silk dress with rich embroidery, heavy royal gold jewelry set, pink bangles, earrings, small bindi, stylish traditional hairstyle decorated with colorful flowers and hair accessories. The poster contains two beautiful portrait poses of the same girl one standing gracefully with hand under chin near green leafy background, another close-up portrait holding a soft pink flower with a sweet innocent smile. Minimal white background with soft watercolor splash edges around the portraits, dreamy lighting, soft skin tones, natural makeup, highly detailed facial features, realistic jewelry shine, elegant feminine aesthetic. Top center stylish typography text: “HAPPY Birthday” in elegant pink handwritten calligraphy font with small heart design and butterfly elements. Bottom section includes a clean modern monthly calendar layout for 26
Prompt👇
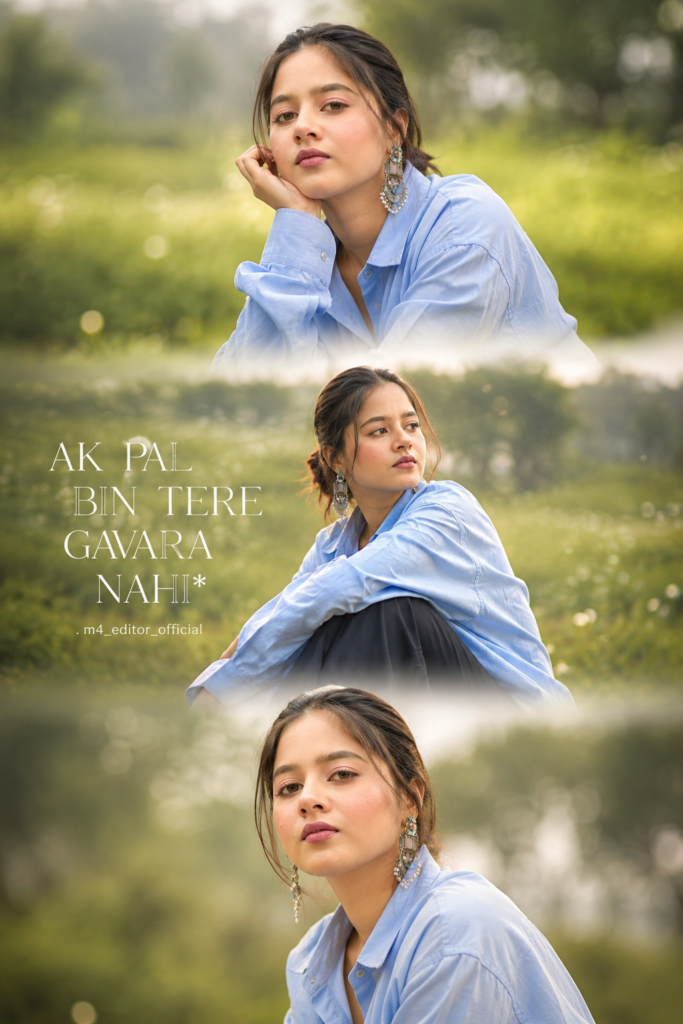
The collage is divided into three
horizontal frames with soft
dreamy wh thansitions
between each section, wearing
an oversized blue button-up
shirt with loose dark pants,
creating a soft emotional
aesthetic vibe.Background
contains blurred green grass fields, distant trees, and dreamy natural bokeh with shallow depth of field.
“write AK PAL BIN TERE GAVARA NAHI* “. m4_editor_official
Prompt👇
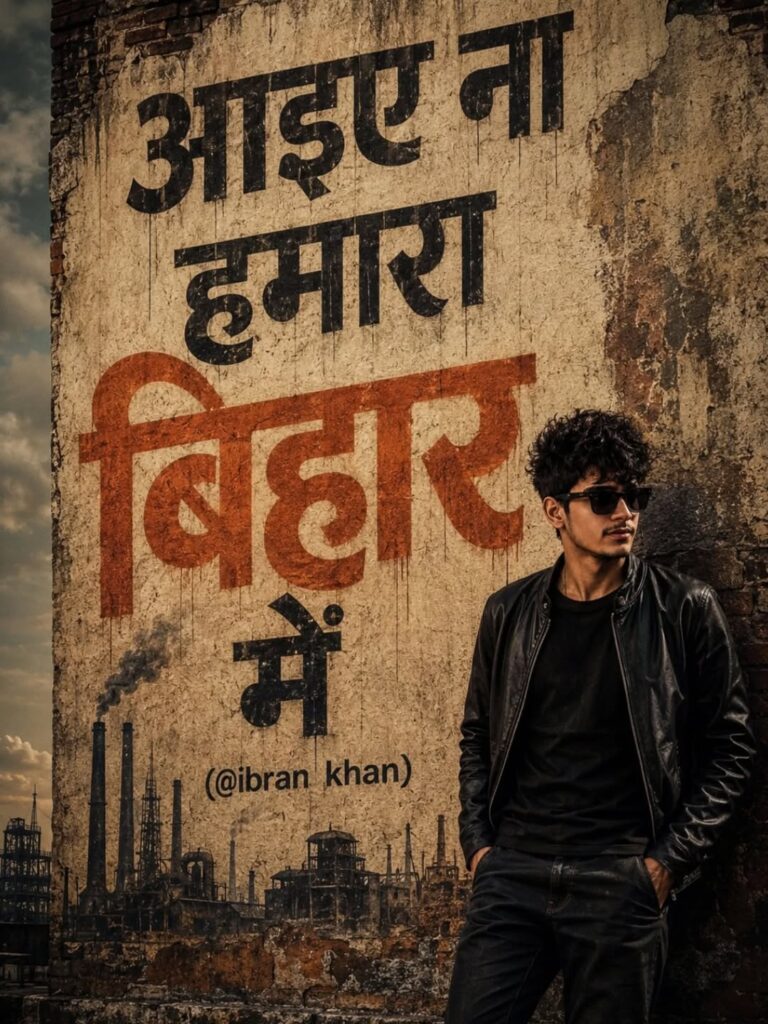
Ultra-realistic cinematic street art wall poster featuring a stylish young Indian boy with messy fluffy hair, black sunglasses, and a black leather jacket standing beside a large vintage textured wall. Moody urban atmosphere with dramatic shadows, gritty aesthetic, and warm earthy color tones. Huge bold Hindi typography painted on wall saying “आइए ना हमारा बिहार में (@m4_editor_official)” in artistic graffiti style. Industrial factory silhouettes, smoke, and rough paint textures in background.
Prompt👇
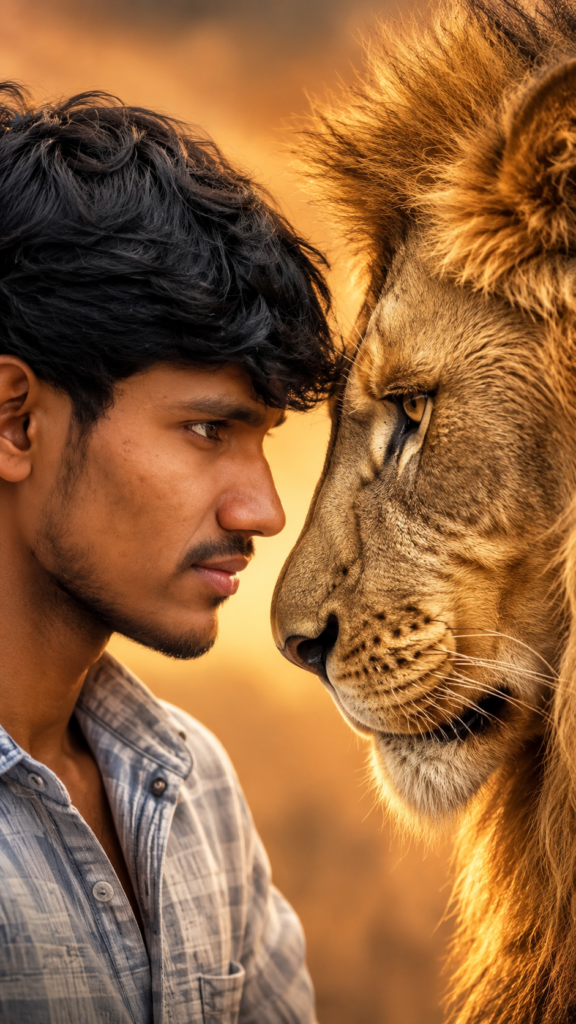
Ultra-realistic 22K UHD cinematic portrait of me face-to-face with a lion (use my uploaded photo for 100% exact face match, hairstyle, skin tone and facial structure no changes at all). Scene: Warm golden background with subtle gradient, minimal environment, intense dramat c atmosphere, safari cinematic tone. Pose: Extreme close-up side profile composition my face and a lion’s face touching nose-to-nose, both staring intensely into each other’s eyes, powerful fearless expression.
My Look:
(Keep My face same 100% as in the reference image and image quality 4K hona chahie. Ratio 9:16)
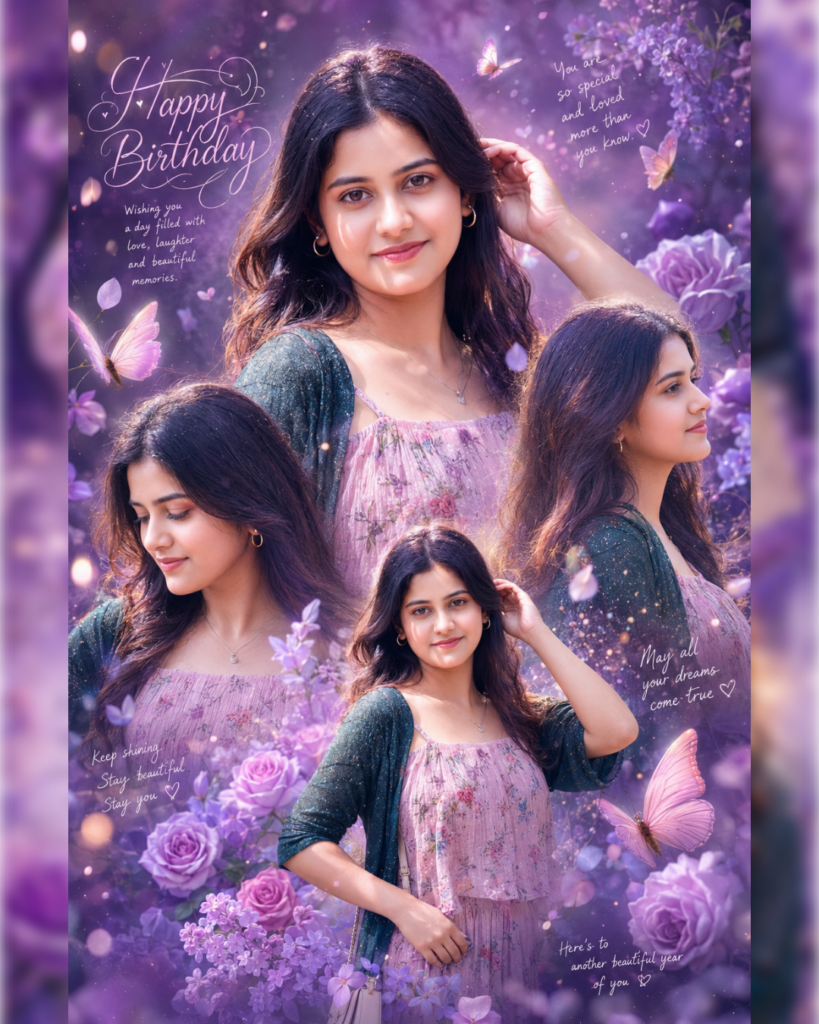
Prompt👇
Ultra-realistic dreamy birthday collage poster of a beautiful young Indian girl, soft aesthetic purple and lavender theme, magical floral fantasy background with glowing butterflies, roses, lilac flowers, sparkles, dreamy bokeh lights and soft mist effects. The design features multiple poses of the same girl blended artistically into one elegant composition one large centered portrait looking directly at the camera with a soft smile, one side-profile pose, one looking down naturally, and one medium standing pose.
The girl has long silky dark brown hair with soft curls, glowing fair skin, expressive deep brown eyes, natural pink lips, subtle makeup, delicate earrings, and a graceful innocent expression. She is wearing a pastel pink floral dress with detailed texture and a dark green shimmering shrug/cardigan.
Likes
Background is filled with romantic purple gradients, floral decorations, handwritten aesthetic notes, dreamy butterflies flying around, glowing particles, and soft cinematic ligh

Prompt👇
Ultra realistic Instagram Amilestone celebration poster design. A stylish Indian teenage boy wearing black sunglasses, black-white check shirt, blue jeans and white sneakers. Two different poses of the same person – one upper-body stylish portrait looking sideways at sitting pose on giant metallic center. Bright orange cinematic gradient background on top Flywith smoky dark grey background at bottom separated by torn paper effect.
Buchessayerkeve the top right, and one full-body
offee3D “1.5M” text at the bottom
Following
Include realistic Instagram profile Ul on left side with username, followers count,
reels creator details, bio text and social icons. Add floating 3D Instagram logos around the scene with depth blur. Add glowing orange sparks, cinematic lighting, dramatic shadows, high contrast, ultra HD 8K quality, realistic skin texture, DSLR depth of field, stylish
metallic steel with orange glowing edges and circular platform below it. Add “FOLLOWERS” text below. Add handwritten signature style
FOLLOWERS
Prompt👇
Apply a trendy Instagram-style NIGHT flash aesthetic to the uploaded photo while fully preserving every original detail of the subject’s face, hairstyle, expression, pose, composition, and background. Transform the scene into a realistic nighttime environment with deep moody shadows, dark cinematic tones, and strong direct flash lighting. Add a realistic dusty air effect with floating grain particles illuminated by the camera flash for a viral Instagram reel/photo vibe. Create a powerful rear glow and subtle neon-style backlight behind the subject, producing atmospheric haze and dreamy bloom around the hair and shoulders. Keep the exact same framing, pose, camera angle, and background structure untouched. Enhance skin with glossy luminous highlights and soft peachy undertones while maintaining natural realism. Add realistic flash reflections, high contrast, soft shadow falloff, and subtle wet-look shine on the skin for a luxury night-photography aesthetic. Enhance stray hair strands with sharp rim lighting from the backlight. Hard rule: Do not change the face, hairstyle, facial structure, skin tone, body shape, composition, or background elements. Keep everything identical to the original image except for the cinematic dusty night-flash lighting and atmosphere.
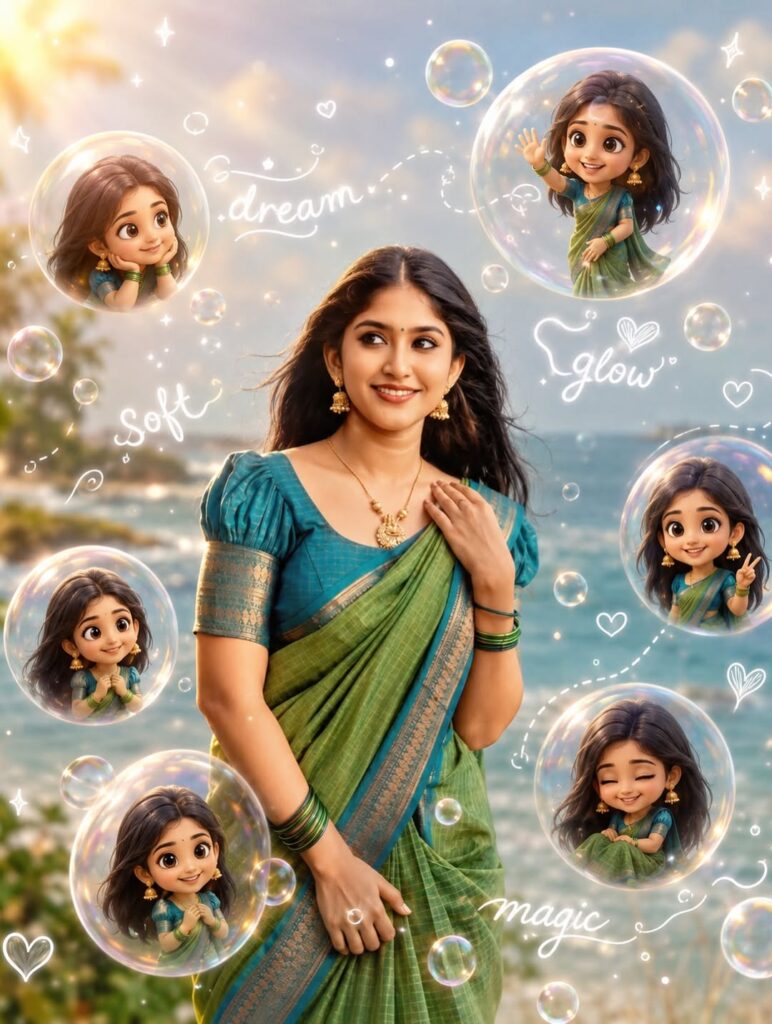
Prompt👇
Create a stylish cartoon-realistic collage of a cool young Girl and his chibi mini versions. Around him are 5 cute chibi versions of himself in different poses sitting, jumping, lying down, waving, and drinking iced coffee. Style should be ultra-detailed, soft cinematic lighting, warm tones, shallow depth of field, trendy Instagram aesthetic, highly expressive cute faces, fluffy hair, smooth skin, and glossy eyes. Add white doodle outlines and hand-drawn elements around the characters like stars, hearts, crowns, sparkles, and text such as ‘Good Vibes’, ‘Cool’, ‘Smile’, ‘Happy’, and ‘Chill’. Background should be softly blurred Overall look should feel playful, aesthetic, premium, and professional like a viral social media poster. High detail, 4K quality, balanced composition, soft glow, cute animated vibe mixed with realistic photography.” Don’t change face Aspect
ratio 3:4